Contents:
COMMON CUSTOM FILEDS CONFIG:
Polylang:

Description and a short description:
Variation description:

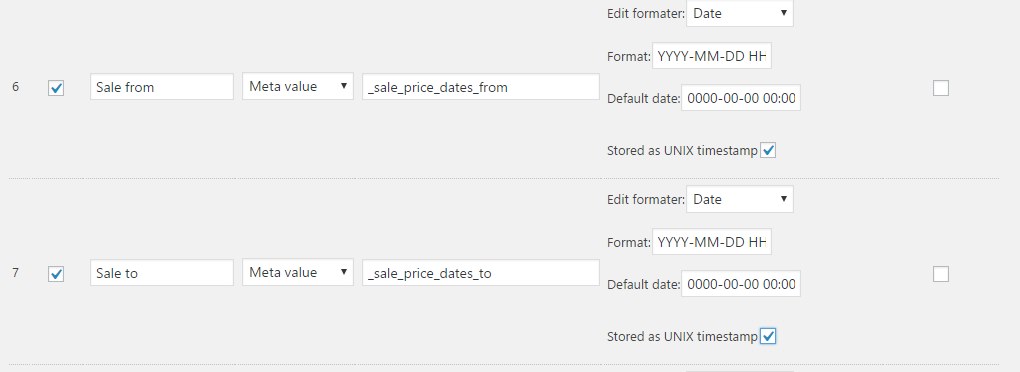
Sale from / to:
After purchasing product, you should install it. Make sure that you have a valid WooCommerce plugin installed on your site.
Download your plugin package. Go to your Dashboard > Plugins and click on 'Add New'. After that click on 'Upload Plugin' and click on 'Choose file' and choose your newly downloaded plugin package. Click on 'Install Now' and wait for installation manager to finish the job. After that click on 'Activate plugin' and you should see your newly installed plugin on your dashboard menu. You'll be asked for 32 characters length API key, so insert API key we provided to you after purchase. Plugin is now ready for use.
There will often be a new version of the plugin. When there is a new version you'll get a notification (Image 1.) when you enter ELPM in your dashboard and by clicking 'OK' you are downloading new plugin package. To install a new version, you must go to 'Plugin' section, deactivate and then delete old one. After that install a new plugin like in section 1.1. with the newly downloaded package, activate it and you are ready to continue using ELPM.

Image 1.
On plugin settings panel you can set up some basic look and functionality.
-
- Fixed colums count - To make any column fixed move it to be within first [fixed columns count] columns.
- Products per page - Max number of products to be shown on the page. If your server limits execution resources so spreadsheet loads incorrectly you will have to decrease this value.
- Enable Add - Enables adding product when importing.
- Enable Delete - Enable deleting of product in table.
- WooCommerce columns visibility - Check Woocommerce default colums you want to see in your table.
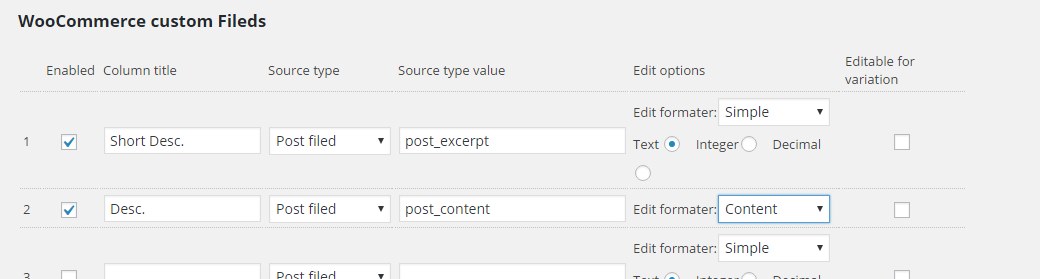
- WooCommerce custom Fields - You can add some custom fields by tick "Enabled" after number of custom filed. You can set that custom field name, source type, edit options and set if it is editable for variation or not.
After all changes you made on Settings panel, click on 'SAVE' button on the bottom. If you edited colums visibility, you should do
'Options'->'Clean Layout Cache' from top menu in spreadsheet editor window.
2.1. WooCommerce custom fields
You can set up to 20 custom fields from ones that are available in WooCommerce. By marking 'enable' you are enabling that field. Available properties that can be set are:
Enabled - enabled or not a checkbox.
Column name - the name of the columns that will be shown in the table.
Source type - will it be post field, meta value or term taxonomy.
Source - the source that you select by typing available source, depending on source type you selected.
Edit options - select type and format, various of styles available.
Editable for variation - check if it would be editable for variation or not.
Example of different fields (Image 1.)

Image 1.
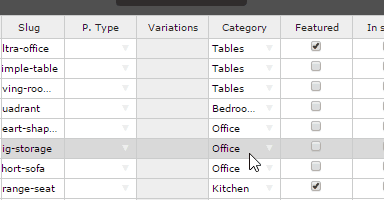
As you can see Editor window is all Excel-like so it means that you can edit and browse data like on Excel spreadsheet. If your number of rows/columns exceeds overall height/width of your screen, you'll be able to scroll down or left-right so you can see whole table contents.
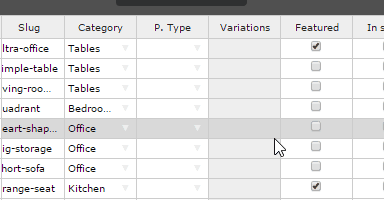
First [fixed columns count] rows are fixed (as you set it on Settings panel). So while you scroll left / right it will stay where they are (Image 2. first 3 rows fixed - example).
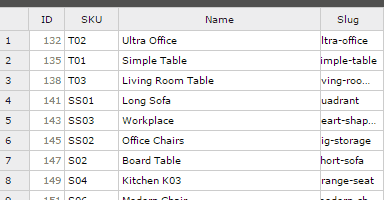
Image 2.
Columns are draggable and resizable. If you want to reorder some column, go to column title cell and press and hold click on that cell very left (Image 3.). While it is pressed you can reorder that column left or right. Also if you want to resize it, go to that column title cell and press and hold click on very right of that cell while you resizing it (Image 4.).
|
Image 3. |
Image 4. |
If you select multiple row/column values and click on right bottom corner of that selection. You can copy that selection to rows/columns below like on Excel. Depend on the field type, you can edit, select from a drop-down list, multiple select, check/uncheck it. Also, you can navigate through the table with keyboard arrows (Image 5.).
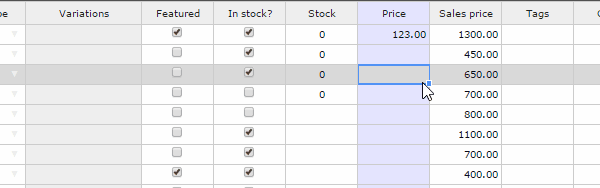
Image 5.
If you selected 'Enable Delete' in the settings panel, when you hovering fixed fields columns or above row numbers you'll see cross-stitch on very left. By clicking on it you are deleting that row (Image 6.).
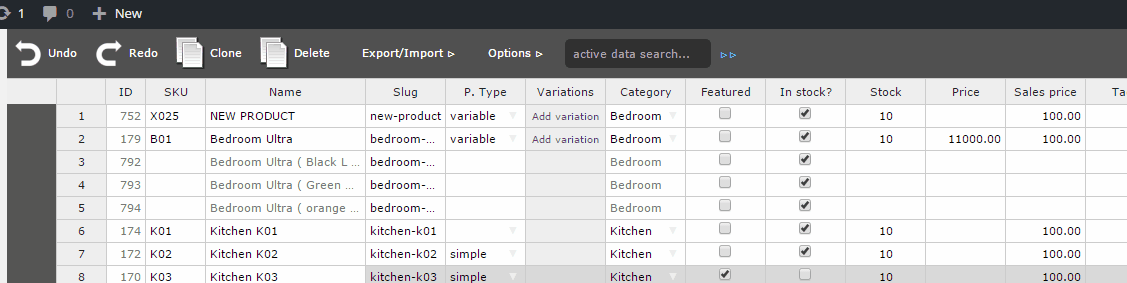
Image 6.
All changes that you make on the table can be easily undo/redo with top bar functions. There is undo/redo option, Clone option - you can clone selected row(s) just in one click, Delete - delete selected row(s). Active data search is used to search entire table for string, there is a number of found elements and that elements are highlighted. Top bar (Image 7.).

Image 7.
In the editor window, on the right side, you'll notice Filters bar. You can hide/show it by clicking on the arrow above Filters label. It is shown by default.
You can filter your table result by SKU, Product Name, Category, Tags, Shipping class, Product Status, + attributes fields. After choosing filter options, click on 'Refresh' on top of filters bar to show filtered results (Image 8.).
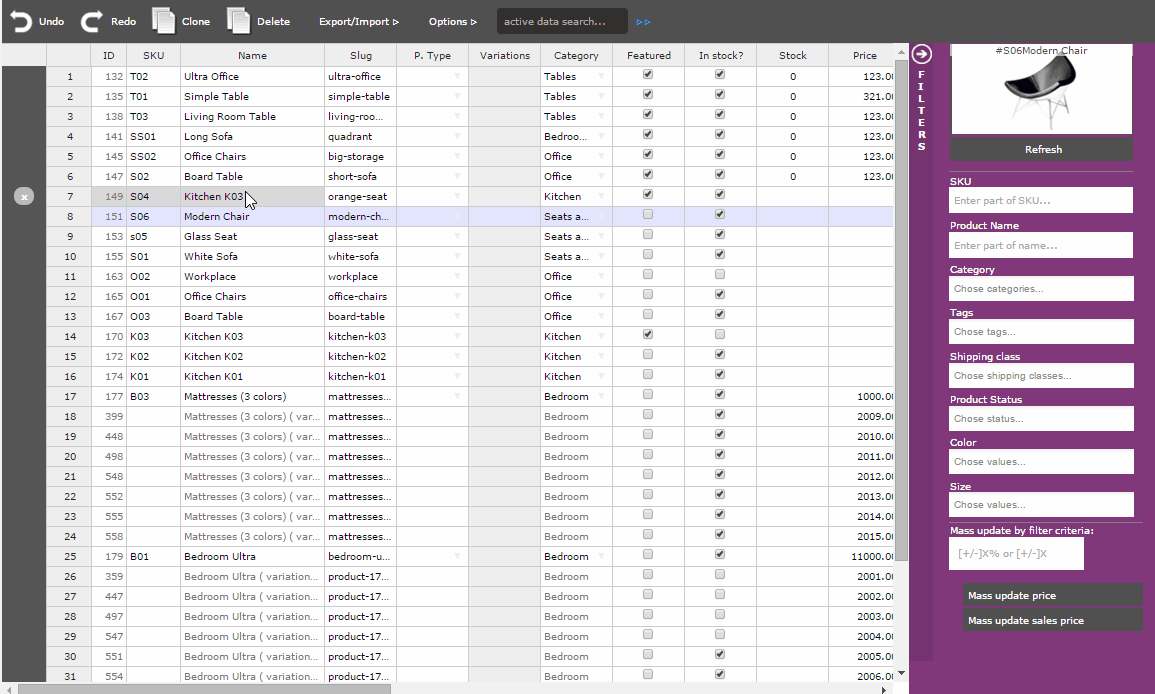
Image 8.
3.2.1. Mass update price / sales price
Another great feature that is located in Filters bar is mass update by criteria. You should define some criteria with this format [+/-]X% or [+/-]X (where X is value). Then you can update all filtered price or sales price, depend on what button you click on.
Example:
+20% then click on 'Mass update price' - it will update the price of the filtered product and increase it for 20%.
-52 then click on 'Mass update sales price' - it will update sales price of the filtered product and decrease sales price for 52 of default currency value.
3.3. Variations
You can easily add variations to every product that have Product type set to 'variable'. There is a row called 'Add Variation' and if the product is variable, you can click on add variations and add variations by attributes. You can set attribute values immediately or you can choose it later. Also, you can set the number of variations you want to be added but you must choose 'Set later in spreadsheet' for at least one variation value. Also, you can set 'Do not variate' if you don't want to variate by that field (Image 9. example of pop-up). NOTE: If you want that each variation is available in the shop front, you must declare it's price.
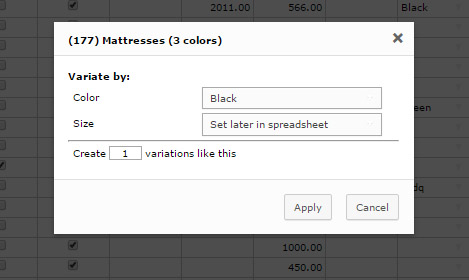
Image 9.
4. EXPORT / IMPORT DATA SETTINGS
When you are adding new product/variants using import cells of 'id' column should be empty or set to 'n'. If variant is added along with product for value of cells in 'parent' column you can use SKU, slug or title match nomination 'SKU:<sku of parent>', 'slug:<slug of parent>', 'title:<title of parent>'.
Using 'n' instead of an empty cell for product/variant you want to mark as new explicitly is good practice because it guarantees that the product/variant will not be matched with some existing product/variant.
4.1. Export / Import data
With our plugin you can easily import or export your products data.
By clicking on 'Export/Import' -> 'Export CSV' your browser will download .CSV file of your products.
By clicking on 'Export/Import' -> 'Update form CSV' new panel will open. There you select .CSV file you want to import. If you edited a file (in MS Excel, Libre Office or any spreadsheet or text editor), make sure you saved it in a correct format 'CSV Comma Delimited (*.csv)'. Also if you thicked 'Enable Add' in Settings panel and if you are adding a product with importing .CSV, make sure that 'id' field is empty. If everything is prepared well, click 'Import' and wait for products to import.
4.1.1. Images and gallery import / export settings
Our plugin gives you the ability to import and export images with CSV file. When exporting there is URL to your image in images row, and URLs of images separated by a comma in gallery row. When importing images you should input full valid URL to your product image in 'image' row of CSV and full URLs separated by a comma for 'gallery' images row.
4.1.2. Variations import
If you want to create new variations with products import you need to set 'parent' column of that new variations. That field will contain information about parent product (that must have Product type set to 'variation'). The field should be set choosing one of next rules:
Recommended if there is parent product created:
id:id_of_parent where 'id_of_parent' is parent id, example: id:555
If there is not parent product also (you are creating it with its variations too) you should use some of the following, where SKU is recommended:
sku:sku_of_parent where 'sku_of_parent' is parent sku, example: sku:S04
slug:slug_of_parent where 'slug_of_parent' is parent slug, example: slug:living-room-table
title:title_of_parent where 'title_of_parent' is parent title, example: title:Living Room Table
Also, make sure that in CSV file you will import, variations are ordered in rows right after their parents.
4.2. Custom Export / Import data
By going to 'Export/Import' -> 'Custom import/export settings' new panel will open where you can customize your Import / Export file format.
F
Custom import options:
- If not found in CSV change existing product status to 'Pending' - used when importing CSV that contains full product list.
- For imported products override status: - select one of status from the drop-down for product override, also used when importing CSV that contains full product list.
- Thousand separator is '.' decimal is ','.
- CSV delimiter: - sets CSV delimiter for import, default is ','.
- Use custom import format - enables/disables custom import.
- The first row is header row (skip it) - set if the first row in your CSV is header row and you want to skip it.
Custom export options:
- CSV delimiter: - sets CSV delimiter for export, default is ','.
- Use custom export format - enables/disables custom export.
- Input columns one by one in order your CSV file will export - select columns you want to export, must include ID or SKU.
4.3. Remote auto-import options
In 'Export/Import' -> 'Custom export/import settings' there is option to allow remote input.
'Allow remote import' enables/disables remote import. IP address should be comma separated if there are multiple IP addresses.